![]()
Previous studies of silicon dimers adsorbed on the Si(001)- 2 X 1 reconstructed surface have shown that below 400K the dimers' diffusion is confined to the tops of rows, thus it is only one-dimensional. Using a Hot STM near 475K we have observed a new and unexpected diffusion mechanism by which dimers cross the rows. This novel diffusion pathway starts with a dimer in the most favorable A type orientation on top of a row. It then rotates and slides into a C type, or Stealth, orientation in the trough. From here the dimer may follow the same steps to return to the A type orientation on either adjacent row. This extension from one to two dimensional diffusion has important implications for the initial stages of epitaxial growth.
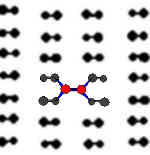
Fig.3 Stealth or C-Dimer. As high as 441K we do not see the C-dimer diffuse. However, at higher temperatures we not only see dimers in this configuration diffuse, but we see conversions between this metastable state and the A-dimer. The reason for the in-shop name is that, compared to the bright streak of a A-dimer, the C-dimer images as only a shadow between rows. See The Ad-Dimer Configurations page of the Gallery for energies and a larger diagram. |
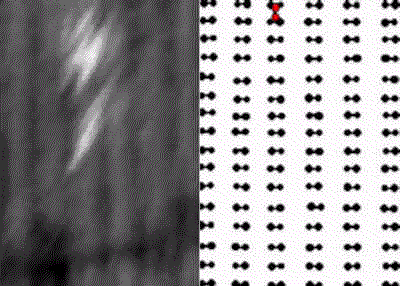
Fig. 5. Across the Rows
Diffusion involving Intermediate
"Stealth"/C-Dimer State. Here
a low energy A-type dimer random walks along the top of a
row, rotates, and slips between the rows to be a
metastable C-type. The dimer then slowly diffuses along
the trough, before climbing to an adjacent row where it
resumes its diffusion as an A-dimer. Note that through
this process the dimer changes rows. This is an excerpt
from a longer movie that may either be viewed as a Java Applet or as an Animated GIF. For a discussion of the diffusion
mechanisms along the row and along the trough, see The Piecewise Diffusion of the Si Dimer. Image Rate= 1/4.6min; Temperature= 475K.
|
Fig.4 Filled vs. Empty State Images of a Stealth Dimer. While the filled state image shows only a buckling of the rows, the empty state image allows us to see that there is indeed a dimer between the rows. Note: rows and troughs trade appearances as the bias switches.(Fig.3 was taken with about +2 Volt bias, thus the stronger image of the buckling.) |
Copyright 1996 by the Regents of the University of Minnesota,
Dept. of Physics & Astronomy. All rights reserved.